 So we are almost through the list of sweet treat crazes of
2013, but I have been saving this particular sweet treat craze for a special
little nephew of mine for his birthday. I am of course referring to the
Peekaboo cake craze that is sweeping social media this year. Whether you've
seen it done on the Great Australian Bake Off with their checker board cake
challenge or seen the images a plenty on line of cakes sporting polka dots,
rainbow swirls and even love hearts, we've all questioned "well how one
earth do they do that?". So we thought we would show you! But given the
abundance of tutorials on line on how to bake polka dots into your cakes we
decided to take it to the next level and try something you hadn't seen before
(we have actually only seen this done once before albeit unsuccessfully), a
name cake. Yes that's right, cut the cake open to reveal the name of your loved
one or maybe some special words. Now this will really only work for short
names/words, unless you find some very small letter cutters, but you may lose
the effect. And of course this can be done with any sort of image cutters, it
doesn't have to be letters, so let your imagination run wild.
So we are almost through the list of sweet treat crazes of
2013, but I have been saving this particular sweet treat craze for a special
little nephew of mine for his birthday. I am of course referring to the
Peekaboo cake craze that is sweeping social media this year. Whether you've
seen it done on the Great Australian Bake Off with their checker board cake
challenge or seen the images a plenty on line of cakes sporting polka dots,
rainbow swirls and even love hearts, we've all questioned "well how one
earth do they do that?". So we thought we would show you! But given the
abundance of tutorials on line on how to bake polka dots into your cakes we
decided to take it to the next level and try something you hadn't seen before
(we have actually only seen this done once before albeit unsuccessfully), a
name cake. Yes that's right, cut the cake open to reveal the name of your loved
one or maybe some special words. Now this will really only work for short
names/words, unless you find some very small letter cutters, but you may lose
the effect. And of course this can be done with any sort of image cutters, it
doesn't have to be letters, so let your imagination run wild.
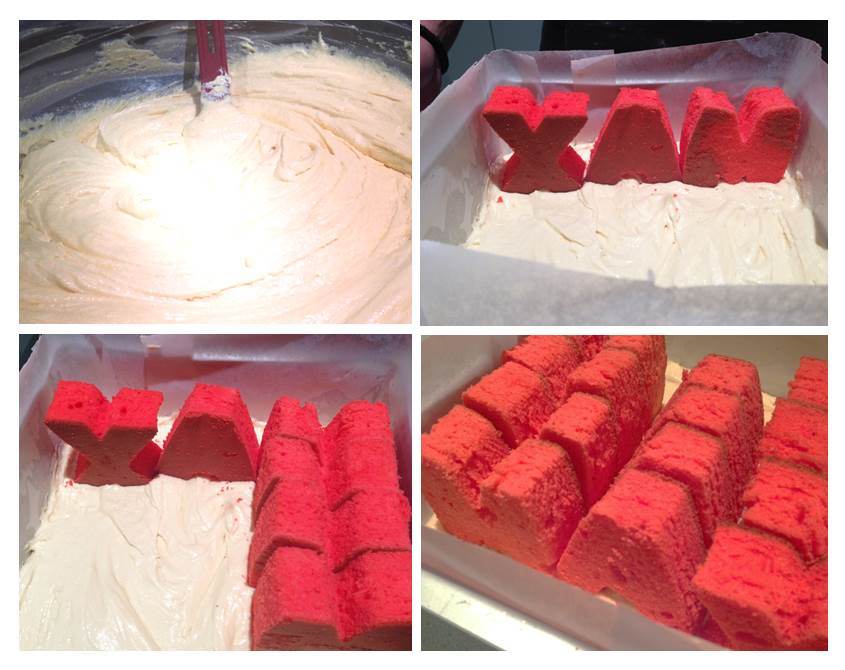
Step 1.
Bake your cakes for the letters inside the cake (get the
recipe for our butter cake here). We baked 3 square butter cakes coloured with
red food gel (one cake per letter to spell 'MAX').
Step 2.
Once your cakes are completely cooled, trim the tops of your
cakes with a serrated knife to ensure a flat surface to work with.
Step 3.
Using letter cutters, cut your letters out and set aside. We
got four of each letter out of each cake.

Step 4.
Prepare your cake batter for the rest of the cake. You can
use the same butter cake recipe here.
Step 5.
Place a small amount of batter in the base of your tin and
smooth over. Align your first row of letters set at least 2cm back from the
front of the cake tin.Stack the remaining letters behind without any gaps.
Step 6.
Using a piping bag, pipe your cake batter in an around your
letters, filling the tin. Use a spatula to smooth over the top of the cake.
Step 7.
Bake cake as per the recipe and allow to cool.
Step 8.
Once completely cooled, trim the cake sides and top using a
serrated knife to ensure a perfectly sized cake with the lettering centered.

Step 9.
Decorate as desired. We covered our cake in butter cream
with fondant cut letters to match the inside of the cake. Get our butter cream
recipe here.


This is amazing! Cant wait to try for my nephews 1st bday. What type of 'tin' are you using? Are you lining it with parchment paper? Thank you!
ReplyDeleteHi Tina, it's just a regular square cake tin and yes you need to line it with baking paper :) Good luck! Would love to see how it turns out.
DeleteThis comment has been removed by the author.
ReplyDeleteI don't understand how the red cake (lettering) doesn't get overdone.... its being cooked twice....
ReplyDeleteI was wondering the same exact thing!
DeleteWell it doesn't get over-done! The lettering is just as moist as the cake around it.
DeleteAre you using an 8 or 9 inch square pan to bake the cake in? Doesn't the cake rise above the letters and overflow?
ReplyDeleteAlso, what size cookie cutters are you using for the letters and where did you get them?
ReplyDeleteNo the letters don't overflow if you put them in the base of the tin and ensure there is no batter underneath them.
ReplyDeleteCan't recall which size cake tin we used, however best to use a size that fits snug with your letters so there isn't room for movement. The cookie cutters were bought from Bake Boss.
But in the recipe you say to put a thin layer of batter in the tin and then put the letters on top of the batter...
DeleteHello. Will the cake be ruined if I do not line the tin with baking paper? Is this step necessary so that the sides wont stick to the tin?
ReplyDeleteBest to use baking paper with this type of cake
DeleteInstead of using baking paper could I grease the outer lining then use flour to help it not sick? Or with the recipe used in this cake do I need the paper?
ReplyDeleteBest to use baking paper with this type of cake
ReplyDeleteCan I make the letters in advance and freeze them? If so what is the best way and length required to thaw them before preparing the second cake (with them inside).
ReplyDeleteI would think that if you wrap each letter individually once it is cooled and stack them no higher than 3 on top of each other, then put all of them in a gallon size ziplock they should be good for about 2 weeks. When you stack them, place parchment paper or plastic wrap between them. They will peel apart a lot easier.
Deletewere letters from bake boss fondant cutters or cookie cutters and what size?
ReplyDeletewow! amazing
ReplyDeleteI suspect my kids cake is going to be larger then that, his name is Zachary and he doesn't like when we call him Zac :) He will though definitely want to participate in baking, since he loves cooking and baking a lot, even cooking games like Papas Games... Anyway, thanks for the amazing idea and the recipe.
ReplyDeletecan I bake a four letter name into my cake?
ReplyDeleteHi guys,
ReplyDeleteThank you so much for this wonderful article really!
If someone want to know more about cake with name I think this is the right place for you!
Hi. Can i make it round instead square?
ReplyDeleteHi. Can i make it round instead square?
ReplyDeletehttp://happybirthdaywishe.com/2016/07/happy-birthday-cake-with-name/
ReplyDeleteThis is amazing! return man 2 unblocked | tank trouble unblocked 1 player | run 3 game | run 2 game | Run 3 y8 | run 3 unblocked cool math | unblocked games | run 2
ReplyDeletenice post.Chocolate Cake In Tirunelveli
ReplyDeleteBirthday Cake
nice post...Happy Birthday Cake
ReplyDeleteWishes Cake
Thank you, I have recently been searching for information about this topic for ages and yours is the best I have discovered so far.
ReplyDeleteonline cake shop Singapore
The blog is to good and informative where i like to discuss about this in my blog thanks for sharing.
ReplyDeletepinata smash cake Singapore
This comment has been removed by the author.
ReplyDelete